Create a Prepayment Invoice
IN THIS ARTICLE
- Invoices in OpenBoxes (Purchase VS Prepayment)
- Indicating prepayment on a Purchase Order
- Create a Prepayment Invoice for ALL items in the PO
- Edit or Rollback a Prepayment Invoice
- Reconcile a Prepayment Invoice - ALL Items
- Reconcile a Prepayment Invoice - Partial Items
Invoices in OpenBoxes (Purchase VS Prepayment)
In a traditional accounting system, there are many different types of invoices: Regular Invoices, Purchase Invoices, Accounts Receivable Invoices, Prepayment Invoices, and more.
As an LMIS (Logistics Management Information System) with limited accounting functionality, OpenBoxes only supports two types of invoices: Purchase Invoices and Prepayment Invoices.
Purchase Invoices
Purchase invoices are the standard invoice - this is the type of invoice to make a final payment on any good or service, and to mark that line as paid in the system. But purchase invoices can only be processed after an item has been shipped in the system. To learn more about creating Purchase Invoices, see this document: Create a Purchase Invoice.
Prepayment Invoices
For vendors that require prepayment, there needs to be a way to process a payment before the items have been delivered. That is where the prepayment invoice comes in. For purchase orders that require prepayment, users can process a special prepayment invoice that will show the payment made before they were delivered. After the items are delivered, a purchase invoice must be created to reconcile the prepayment against the final receipt (more details in the instructions below).
Indicating Prepayment on a Purchase Order
Prepayment invoices can only be processed against purchase orders that have a payment term that includes prepayment. If you do not see the option to generate a prepayment invoice, edit the payments terms on the PO to reflect the percentage prepayment. If you do not have prepayment terms available, they will need to be added by your administrator using the instructions here.
Create a Prepayment Invoice for ALL items
-
To create a prepayment invoice, first open the Purchase Order (PO) that you need to prepay.
Go to Purchasing > List Purchase Orders. Find the PO that you need to invoice and open the order by clicking on the order name.
- On the order view page, click on Generate Prepayment Invoice.
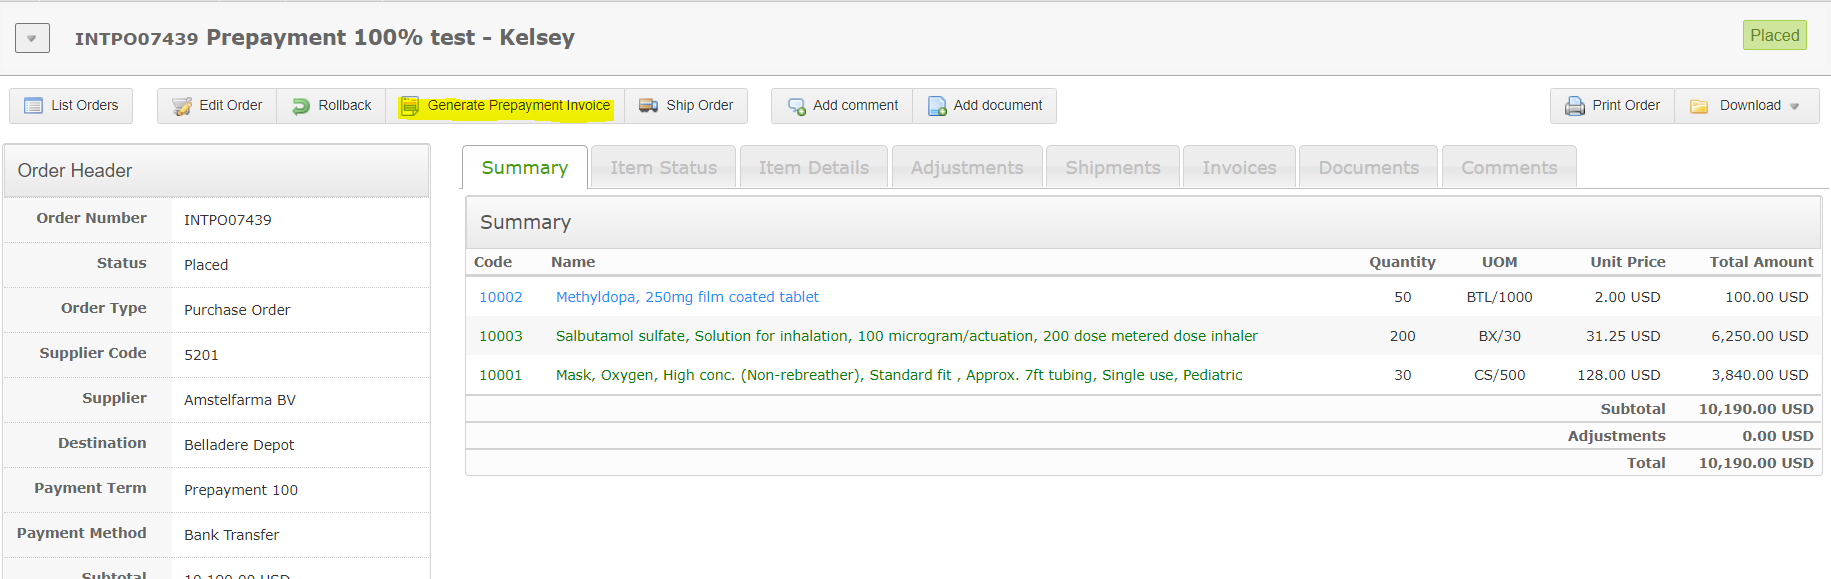
If you do not see this option, check the prepayment terms. The payment terms must be prepayment and the PO must be Placed for the Generate Prepayment Invoice option to appear.
Also check the Invoices tab to see if a prepayment invoice was already generated.
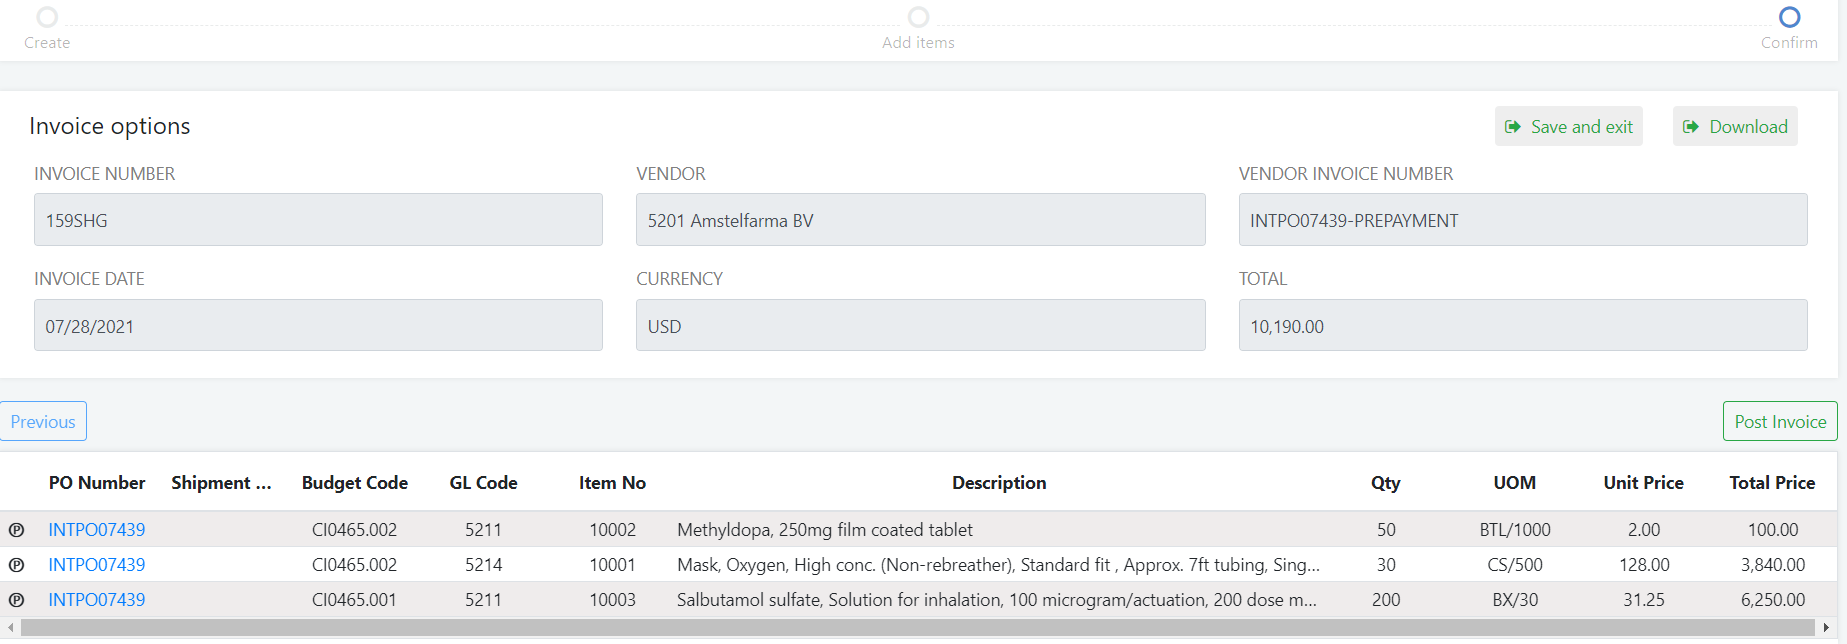
- Clicking on Generate Prepayment Invoice will automatically generate an invoice based on the PO lines and the prepayment percent in the PO terms:
-
The invoice will show all lines on the purchase order, with the quantity to invoice and final cost applied based on the prepayment percentage.
For 100% prepayment, the invoice will exactly match the PO. For 50% prepayment, the total value for each line will be 50% of the value of the PO, For 25% it will be 25% of the PO value, etc.
-
Ensure that the invoice matches the proforma you received from the vendor, and press Post Invoice to register the prepayment.
- Unlike purchase invoices, lines in a posted prepayment invoice do do not appear as invoiced on the PO. The prepayment is registered, but the lines do not show as invoiced and complete because the items still need to be received and the payment reconciled. See the section below for how to reconcile a prepayment invoice.
Edit or rollback a prepayment invoice
Prepayment invoices cannot be edited because they are generated based on the information in the PO. If after generating an invoice, you notice an error, you will need to delete the invoice and recreate it after editing the PO to reflect the proforma.
- From the invoice edit page, press Save and Exit to go to the invoice view page.

- From the view page, press Delete to delete the invoice:

- Once you have deleted the invoice, go back to the PO and edit it, using the instructions for editing POs after posting in Edit a purchase order.
- Once the PO is correct, press the Generate Prepayment Invoice button again to restart the process.
-
If the invoice is already posted, you must first roll it back and then delete it.
On the invoice view page for a posted invoice, you will see a Rollback button. Select that button to move the invoice back to pending status.
Once the invoice is pending, you will see the delete button.
You can find the invoice by going to Invoicing > List Invoices or by opening the associated PO and clicking on the Invoices tab.
If you have an integration with another system for invoices, check when the transfer of invoices occur. Updating the invoice in OpenBoxes might not update the invoice already transferred into the other system!
Reconcile a Prepayment Invoice - ALL Items
To completely close the invoices for Prepayment POs, you must reconcile the Prepayment Invoice and create a final Purchase Invoice. For Prepayment PO lines to be officially invoiced, they must be shipped and added to the purchase invoice. This process verifies that we received what we paid for, and addresses any discrepancies.
This section shows you how to create the final invoice for ALL the items in a Prepayment PO.
- After the prepayment is completed, the purchase order goes through the normal shipping and receiving process. If at any point an item needs to be changed or cancelled, make those changes to the PO.
- Once all items on the PO are received or cancelled, Click on Generate Invoice button in the PO view page.

- The invoice will be generated for the full PO, with the previous prepayment substracted at the bottom:

- For a 100% prepayment PO with all items received, the total value of the final invoice will be 0. For a partial prepayment or a PO where changes were made after prepayment, there will be a balance left to pay. Verify that the invoice matches the final proforma and press “Post Invoice” to finalize.
- These lines will now be marked as invoiced in the PO and in all open PO reports.
Reconcile a Prepayment - Partial Items (Only available for versions 0.9.2 - hotfix1 and newer)
OpenBoxes also allows invoice users to finalize invoice for only some items in a Prepayment Purchase Order (PO). This is important if only some items in a PO have been shipped and the team needs to pay for those shipped items. Vendors can take a long time to ship all the items in a PO, sometimes even months, which keeps the items incorrectly encumbered (i.e. they are an outstanding financial risk to the organization) and can cause audit issues and confusions.
For example, let's say there is a 50% prepaid PO with 10 items. The vendor delivers 3 of the 10 lab items for now. When they deliver the items, they also issue an invoice that matches the shipment with those 3 items. The team can then process the invoice for the 3 items against the Prepayment PO and pay the remaining 50% for those 3 items only, instead of waiting for the rest of 7 lab items to also be shipped, which might be a a month or more away.
When can you generate final invoice for partial items in a Prepayment PO?
- The PO has adjustment(s) item that has not already been invoiced.
- An item's shipment has been cancelled and that cancellation has not been invoiced.
-
At least one item in the PO has been shipped and has not yet been invoiced.
Generate Final Invoice for Partial Items in a Prepayment PO
-
On the PO View page, click on Generate Invoice.
-
You will see a message stating that not all lines on the PO are available to invoice. Click OK if you want to proceed with invoicing only the lines available to invoice.

-
In the following Invoice page, you will only see the lines that are ready to be invoiced. You can see the inverse prepay lines (red lines) for only the available line items.
You can click on the three dots on the right-hand side to perform the following actions to finalize your invoice:
a. Edit the quantity to be invoiced for the item. The edited qty can be less than the original qty in the purchase order. This will also show the prepaid amount corresponding to the edited quantity.
After you edit the qty, click on Save to see the qty changes! Do not hit ENTER on you keyboard!! This will submit your invoice instead of saving the changes.
b. Remove items from the invoice. Removing the invoice line will also remove the associated prepayment line.

- After you check that the numbers look good and match the final invoice provided by the supplier, click on Submit for Approval.

