View Inbound Shipments
IN THIS ARTICLE
Inbound Shipments or Inbound Stock Movements are shipments coming into the location that you are logged in to. For example, if I am logged into the UGHE Kigali Store Room, I will only be able to access shipments expected to arrive at the UGHE Kigali Store Room.
We can view Inbound Shipments for a location through a Dashboard Indicator or through the Top Menu Bar. This document focuses on viewing all incoming shipments to a particular location.
- First, we will see the different ways how we can get to the Inbound Shipments List.
- Second, we will look at the details of the Inbound Shipments List page.
👁View
We can view Inbound Shipments through the Dashboard Indicator or through the top Menu Bar.
Dashboard Indicator
The Dashboard Indicator Incoming Stock Movements by Status gives a snapshot view of all incoming shipments that are Pending, Shipped, and Partially Received. To configure your dashboard to see this indicator, see this document.
You can also click on the numbers that will load the Inbound Shipments List page with filters of status Pending, Shipped, OR Partially Received. For the example screenshot below, I clicked on "5" for Pending on the indicator which loaded the page below. As you can see, the filter for Receipt Status is Pending.
You can also go to the Top Menu Bar, click on Inbound > List Inbound Movements to load the Inbound Stock Movements List page.

Inbound Shipment List Page
Header

In the Header, we can see the name of the List Page: Inbound Movement List. There are also three actions users with required permissions can take (Users with Browser access will not see these options).
- My Stock Movements: Clicking on this button will filter the Shipments List to show only the shipments that were Requested by and Created by you.
- Create Shipment from PO: You can click on this option to create a Shipment from PO. The destination will default to the location you are logged into.
- Create Stock Movement: You can use this option to create a Stock Movement. The destination will default to the location you are logged into.
Filters

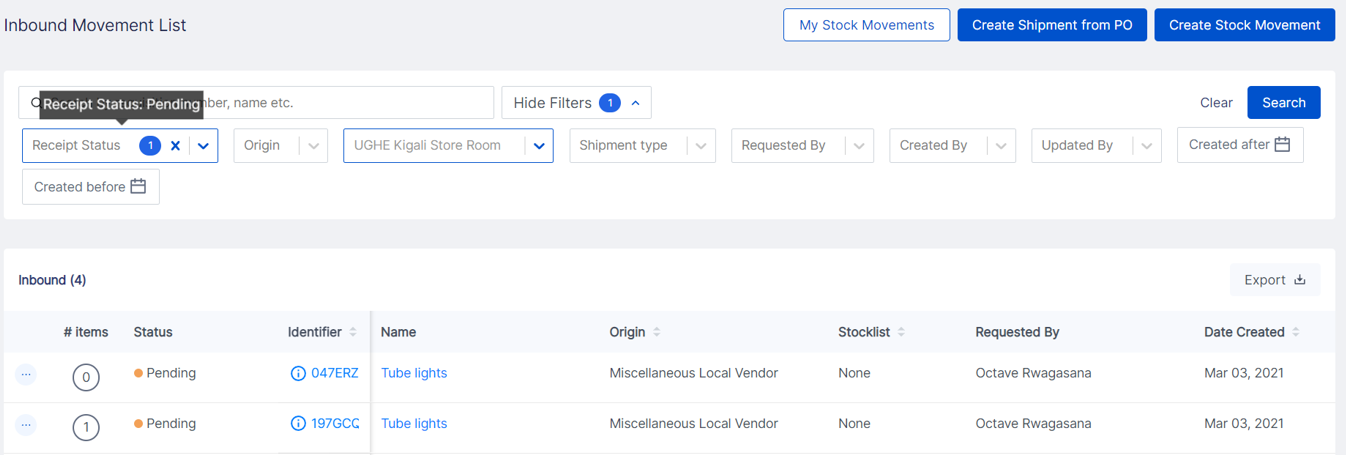
Below the Header, we have our filters for the Inbound Movement List. Users can filter by Receipt Status, Origin, Shipment Type, Requested By, Created By, Updated By, Created after, and Created before. The Destination defaults to the location you are viewing and it cannot be changed. UGHE Kigali Store Room, in this example. If you wish to view incoming shipments with a different location, change your location using the location chooser.
You can also hover over a field to display a tooltip with field information. In the screenshot above, I hovered over the Requested by field. For fields where we can select multiple selections to filter by, we can see the number of options selected. See the Receipt Status field above. I selected 'Pending' as the Receipt Status.
To Apply the selected filters, click on Search.
To Remove filters, users can either click on the 'x' for each field or click on Clear to remove all filters.
Table
Below the Filters, we can see our table with the list of Inbound Movements. Any filters applied will be reflected in this list. I applied the following filters: Receipt Status as Pending and Created by Neha Maharjan.

- For each Shipment line, there are three dots on the left side which allow users to See the Stock Movement in detail, Edit Stock Movement, and Delete Stock Movement. Users need appropriate permissions to see all options.
- The # Items Column shows how many items are included in the shipment.
- You will find the following statuses under the Status column:
- Pending: This shipment has been created but not shipped yet.
- Shipped: This shipment has been sent.
- Receiving: Part of the shipment has been received.
- Received: All of the shipment has been received.
- Users can click on the Identifier and Name hyperlinks to go to the Shipment Detail page.
- The Origin is the supplier/location the shipment is coming from.
- If the shipment was created using a stocklist, the stocklist name is shown under Stocklist.
- Requested by column shows who requested the shipment.
- Date Created shows when the shipment was created in OpenBoxes.
- Expected Receipt Date is displayed if the creator input the information.