Transfer Stock Internally
Previously called Stock Transfer.
OpenBoxes gives users the ability to efficiently manage the transfer of stock from one bin location or zone to another. This feature is helpful for inventory location management. It creates the ability to make changes in OpenBoxes with the goal of more accurately reflecting the physical location of inventory within a depot or warehouse.
It is important to note that the stock transfer feature does not generate an outbound shipment and is only managed within a site in OpenBoxes. It is an internal transfer from one location to another. A stock transfer doesn’t change the total quantity on hand at a given site, rather it will change the location of the inventory at that site.
There are many reasons why a user may want to create a stock transfer within their location. Here are a few examples where this feature may add value:
- A single item needs to be moved to a new bin location (or locations) within the system.
- An entire bin with multiple items needs to be moved to a new bin location (or multiple locations).
- The warehouse is being redesigned or reorganized, and some bin locations are being consolidated or removed.
- The warehouse has made temporary changes to bin locations or the physical layout because of capacity issues.
- Inventory needs to be isolated in a particular bin location or zone, possibly due to hold issues or a product recall.
Creating a Stock Transfer
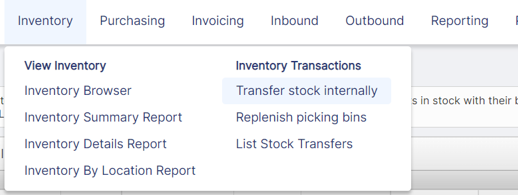
To start a stock transfer, go to Inventory > Inventory Transactions > Create Stock Transfer.
This takes us to the first step in the stock transfer workflow. We will start on the Create Stock Transfer page. This list shows us all of the inventory currently available to transfer. Note that we are able to sort the list by the column heading at the top (item code, product, expiry, etc.). For this example, I’ve sorted by item code.
This workflow also gives users the opportunity to search for a specific attribute. I’ve decided to search for Item Code 10249 by typing it into the box. After searching, we can see that we have one lot of item 10249 on hand with a quantity of 2,400. It is located in Bin E7D2. Let’s use this for our stock transfer by checking the blue box on the left next to the item code. To advance, click the ‘Start Stock Transfer' button on the right.
For Expired Products management, you can click on Expired Items button on the right to only view items that have already expired. Once you select items you want to move, continue with Start Stock Transfer.

The next decision to be made in the stock transfer workflow is selecting the quantity to be transferred. For this example, we will transfer the full quantity. I was able to populate the quantity field by clicking on the ‘Autofill Quantities' button on the left side of the screen.
Next, we select the destination bin location, or where we want to transfer the product to. The bin locations will also be grouped by Zone locations, if applicable. Here I use the drop-down box to select bin location W3A1. It is also important to note that OpenBoxes gives users the opportunity to split the line (green button on the right) and move this item to multiple destination bins. However, for this example, we will be moving the full quantity to one destination bin. After selecting the destination bin, press the ‘Next’ button.

Now we have the opportunity to review the stock transfer details before executing the transaction. Let’s make a final check for accuracy. In this example, it confirms we intend to transfer 800 of item 10249 from bin location E7D2 to bin location W3A1. Given that everything is correct, we proceed by clicking the ‘Complete Stock Transfer’ button on the right.

Our stock transfer has been completed. We are immediately taken to a confirmation page that captures all of the details of our transaction. Most importantly, an identifier has been given to this transfer (928TDN) which is visible in the top left part of the screen.

This transfer identifier is useful to reference this internal stock transfer in other areas of OpenBoxes. The first area provides a view of all recent stock transfers. It can be found under Inventory > Manage Inventory > List Stock Transfers.

Here we can see the stock transfer we just created (928TDN) at the top of the list. We can also search previous stock transfers using the filters on the top.

In addition to the stock transfer list, stock transfer information also displays on the stock card. By going into the Stock History tab of the stock card, we can see the details of the transaction we just created. Here there is a record of the date, time, quantity, and the origin/destination bin locations associated with this transaction. You can see a single line for the stock transfer.
