Ship a Purchase Order
IN THIS ARTICLE
Ways to Ship Items in Purchase Order(s)
Users can ship items in (1) a single Purchase Order or (2) ship items together in multiple Purchase Orders. Sometimes vendors may ship items placed in different Purchase Orders in one Shipment, this is where option (2) can be used.
When items on an order are ready to ship, users can add them to a shipment that can be tracked and received at a depot.
This process is designed to be used upon receipt of a packing list or shipment information but can also be done upon receipt of goods if advance notice is not provided.
The article now discusses the different ways to ship items in PO(s) in OpenBoxes:
Ship items in a Single PO
If the vendor is shipping items placed in one PO, this is the best way to continue.
- Go to the Purchase Order (PO) View Page which you want to ship.
- On the PO view page, click on Ship Order.
Add Items
-
A shipment is created with all items in the Purchase Order. You can see the following details in the Shipment Add Items page.
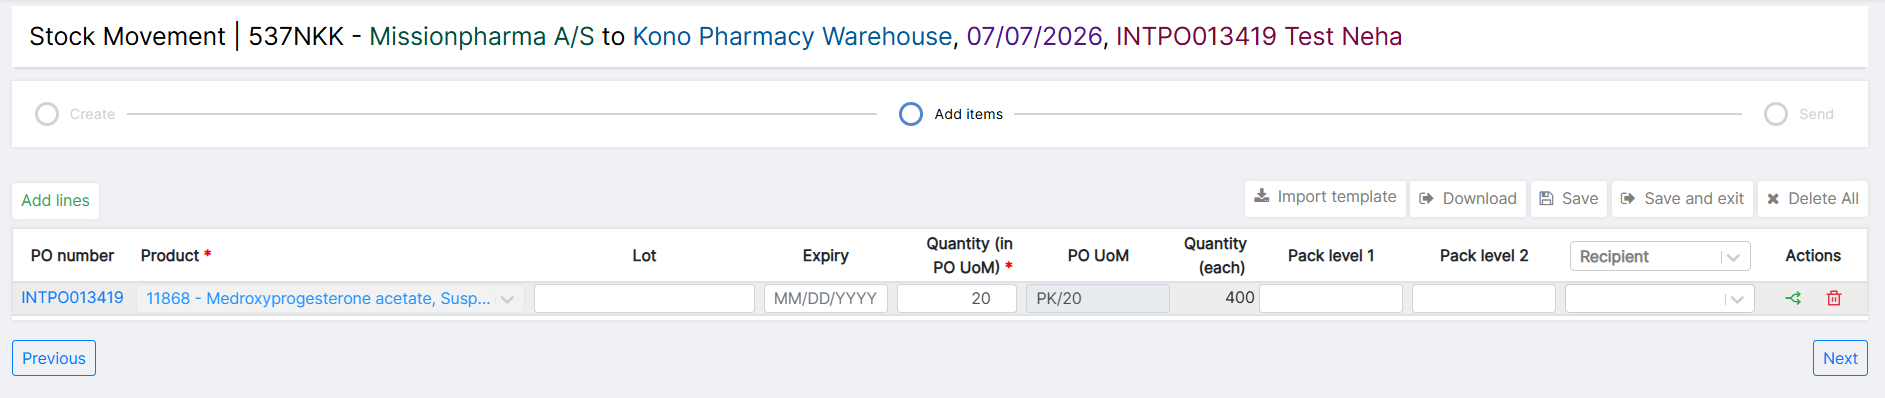
- Shipment ID (537NKK)
- Shipment Details in the Header (Supplier to Destination, Date of Shipment Creation, Purchase Order Number, Purchase Order Name)
- Purchase Order Item Details
-
In the Add Items page, you can take the following actions:

- Remove items from the shipment using the Trashcan/Dustbin icon on the Right-hand side. These items will still be available to ship in future shipments.
- Add items to the Shipment using the Add Lines button.
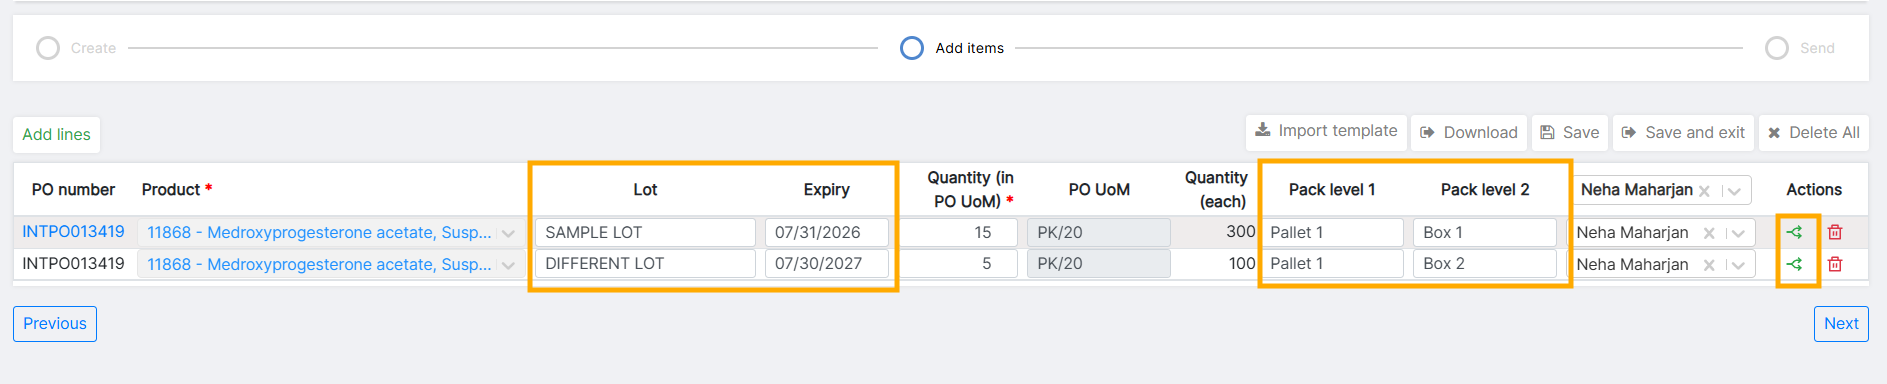
- Add Lot and Expiry for the item being shipped if provided by the vendor.
- Edit the Quantity (in PO UoM) being shipped by the vendor in this shipment. Remaining Quantity will be available to ship in future shipments.
- Enter Pack Levels (Pack Level 1 and Pack Level 2) if provided by the vendor.
-
Enter Recipients for the items. Any Recipient selected for any item will receive shipment update emails. This can be helpful if you want the Recipient to be able to track the item.
-
If the vendor is shipping the same item with different Lots or in different Pack Levels, users can Split Line (Green arrow icon) button under the Actions column.
The Quantity total of the two lines must equal to the original Qty of the original line.
- Once ready, go to the next page by clicking on Next.
Confirmation Page

In the Confirmation Page, users can review the item details in the Table.
Users can enter the following shipment details:
- Ship Date (Mandatory): Select the date when the shipment leaves the vendor. It cannot be later than the Expected Delivery Date.
- Shipment Type (Mandatory): Select if the shipment is being shipped via Land, Sea, Air, or Suitcase.
- Tracking Number: Enter Tracking Number as provided.
- Driver Name: Enter Driver Name.
- Comments: Enter any comments relevant to the shipment.
- Expected Delivery Date (Mandatory): Select the date the shipment is expected to be delivered to Destination. It cannot be before the Ship Date.
Once ready, click on Send Shipment. The status of the shipment will update to Shipped.
Unable to Ship Items in a PO?
Sometimes, when users click on the Ship Order button, they may get an error: "No items available to ship. Look at the shipments tab to see all current shipment associated with this order" even when there are items in the PO and is in PLACED status. In this case, all the items placed in the PO already exist in a Shipment.
Simply, go to the Shipment tab in the PO View Page to access the existing shipment.

Ship Items in Multiple Purchase Orders
If the vendor has shipped items placed in multiple Purchase Orders in one shipment, users can use this process.
-
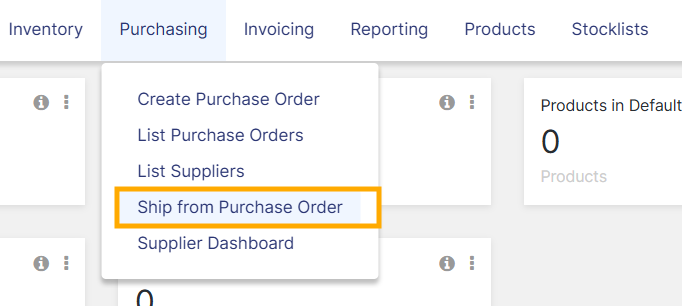
From the Top Navigation Bar, click on Purchasing > Ship from Purchase Order.
-
In the Create Page, enter the following details:
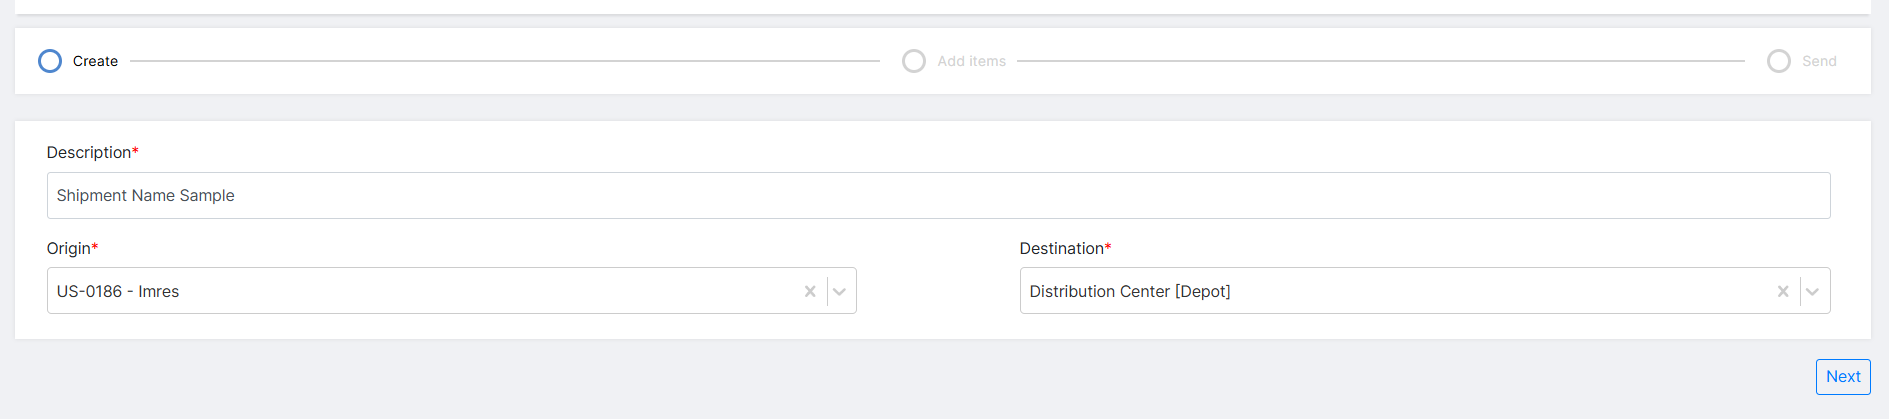
- Description: Enter a Shipment Description.
- Origin: Select the vendor for the Shipment.
-
Destination: Select the destination for the Shipment.
Selecting the correct Origin and Destination is important because only the Purchase Orders placed to the selected Origin for the selected Destination will be available to ship in the next page.
Click on Next to move to the next page.
-
On the Add Items page, users will add the items that are being shipped.

- Click on Add Items to populate items to the shipment.
-
This will open the Add Items modal.
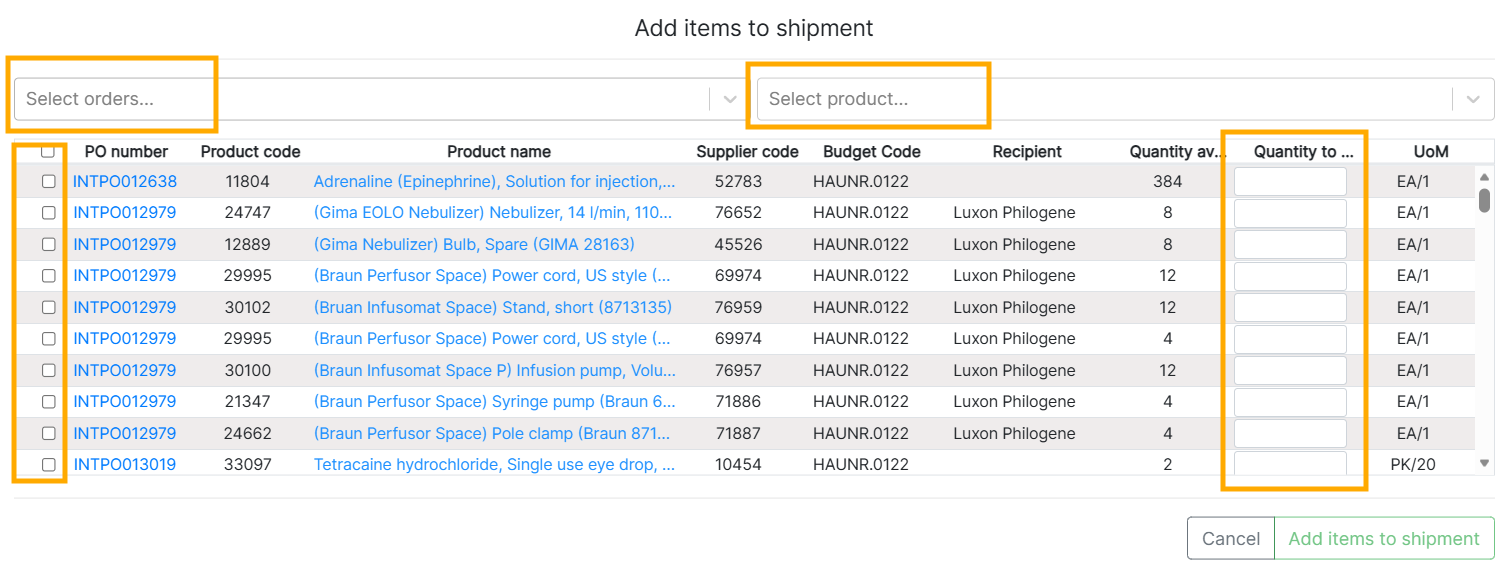
- There are two ways to filter products in the view: by Order Number and Product Code.
- From the table, users can check the checkbox on the left column to select all quantity available to ship.
-Users can also manually type the Quantity to ship for each product.
- Once ready, click on Add Items to Shipment.
-
Once the items are added to the shipment, users can:
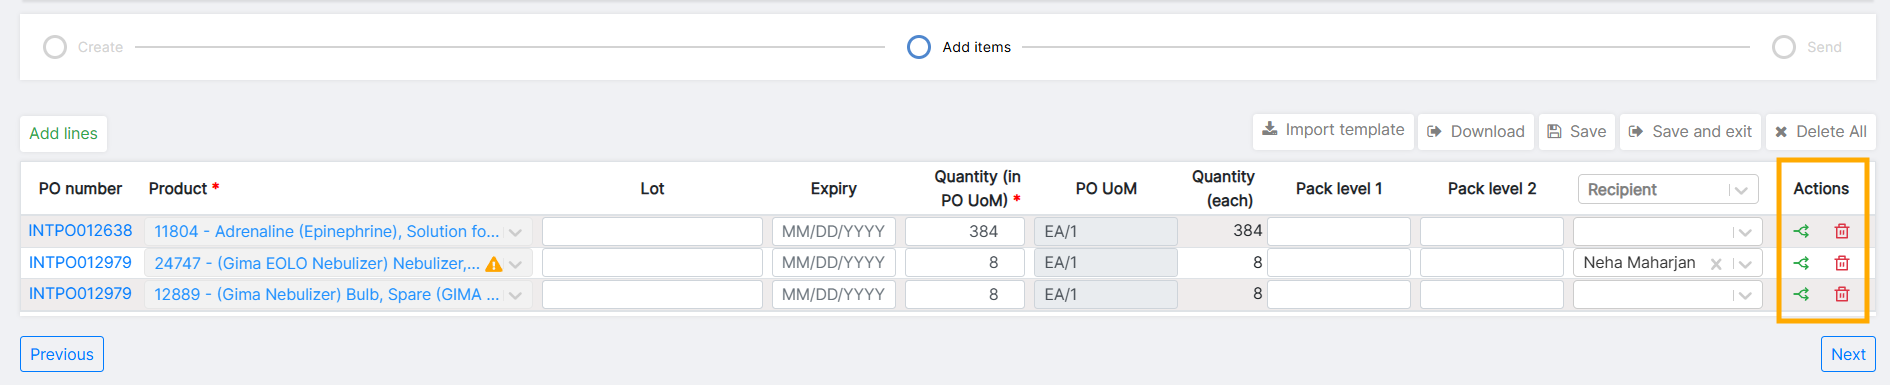
- Add Lot and Expiry for each product
- Split the product lines into multiple lines by clicking on the Green arrow icon under Actions to add multiple Lots for one product, or assign different Pack Levels for the same product.
- Delete a product line by clicking on Delete icon under Actions.
- Add Recipients for product lines.
- When ready, click on Next.
-
In the final Confirmation page, users can review the shipping details for products; add Shipment Type, Expected Delivery Date, and other shipment details.
To Ship the shipment, click on Send Shipment.
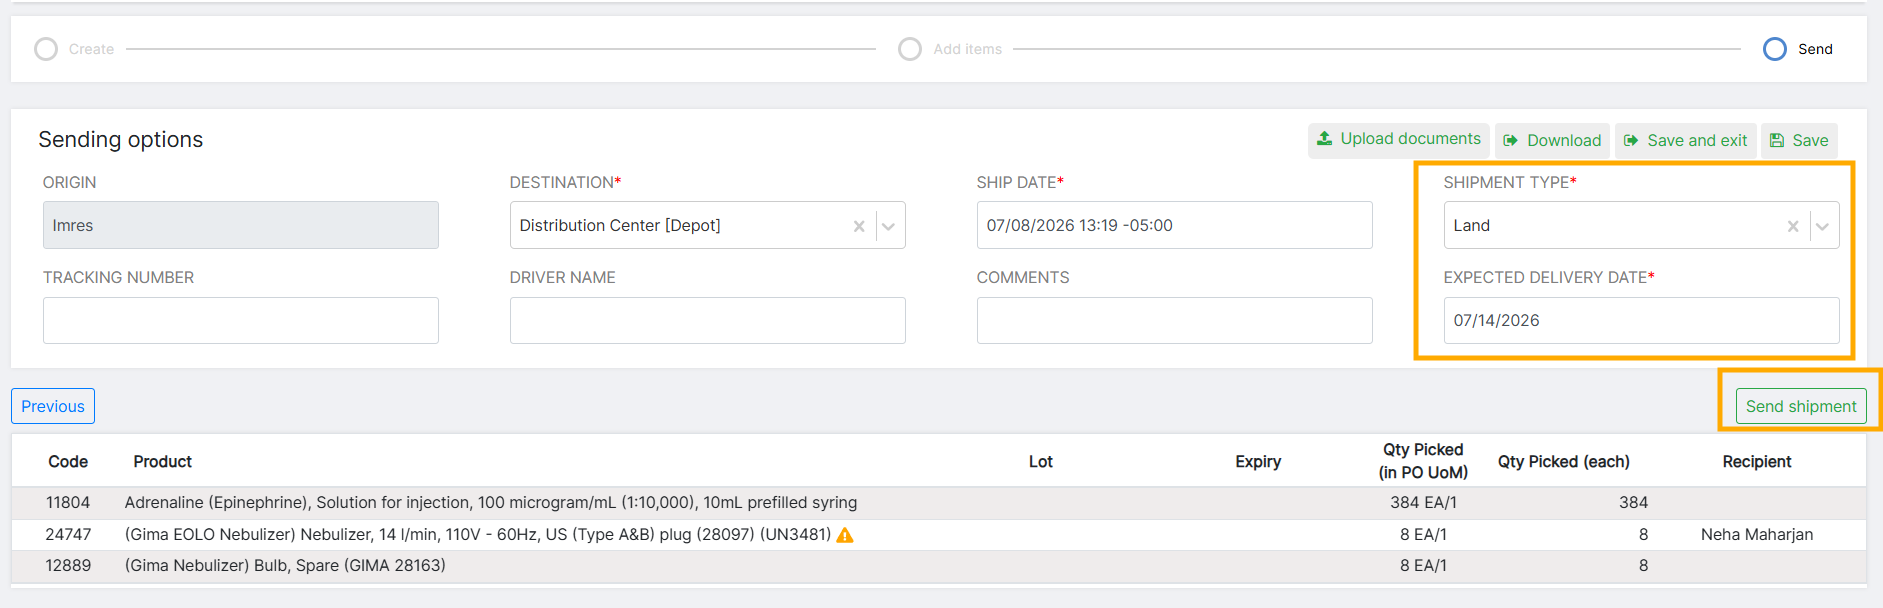
- The status of the Shipment will update to Shipped.
Any items in the PO(s) not shipped in this shipment will still be available to ship.
Ship Items in Multiple POs using an excel import
-
From the Top Navigation Bar, click on Purchasing > Ship from Purchase Order.
-
In the Create Page, enter the following details:
- Description: Enter a Shipment Description.
- Origin: Select the vendor for the Shipment.
-
Destination: Select the destination for the Shipment.
Selecting the correct Origin and Destination is important because only the Purchase Orders placed to the selected Origin for the selected Destination will be available to ship in the next page.
Click on Next to move to the next page.
-
In the Add Items page, click on Download. There are two options to download:
- Available Order Items: This contains ALL items available to ship from the vendor to the Destination.
- Blank Import Template: This only contains the header and allows user to manually add lines to ship.
Users can choose any of the two files to edit and use for import.
Users can copy and paste lines from the Available Order Items to the Blank Import Template OR edit the Available Order Items file to only contain items to be shipped with updated quantities.

-
Whichever file the user decides to use for import must have the mandatory field data: Order Number / Order Item ID / Product Code / Product Name / Quantity / UOM / Budget Code.

- When the file is ready and saved, go back to OpenBoxes, click on Import Template and select the saved file.
-
You should now see all of the items from you spreadsheet updated on the page. Users can split items into multiple lines if there are multiple Lot for the same item or one item needs to be packed in multiple pack levels.
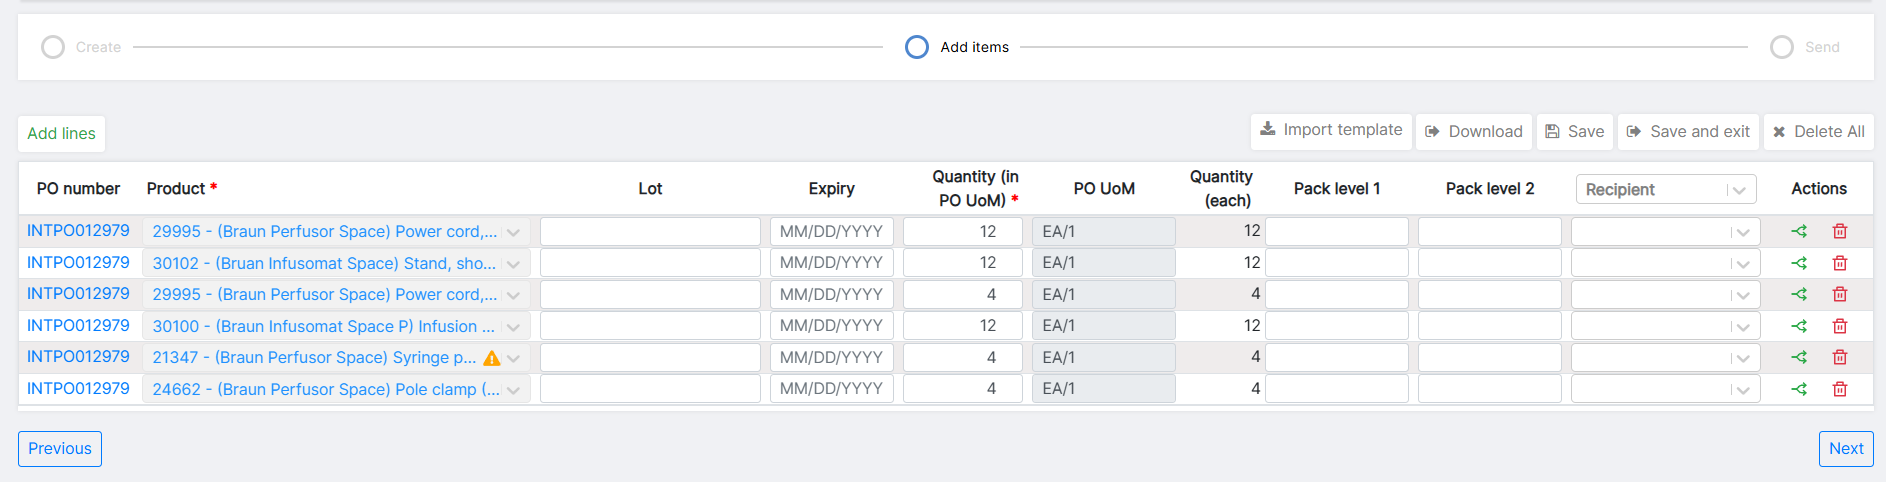
If you are having trouble, here are some common validation errors you might receive and how to fix them:
- Expiry date is invalid - if you have entered a date in the wrong format or way in the past, you will get an error asking you to update it. Please use American style short date (MM/DD/YYYY) as the date formatting to avoid issues
- Qty to ship greater than qty available - This means that you are trying to ship more than is actually on the PO. The error will tell you which line is causing the issue - check the PO to see what quantity is available and update the template.
8. You can now review your shipment items and make any edits that you need to make. Once you are satisfied with the packing list (Add Items Page), press Next to go to the final page of the workflow:

On this page, you can review your work and add a shipment type, tracking info, and comments. You can also upload documents or download any of the available shipping templates. Once you are satisfied that the shipment is complete, press send. This will update the shipment status to send a redirect you to the shipment view page:

From here, the depot can proceed through the receiving process as normal.