Placing Inventory on Hold
OpenBoxes includes a feature that enables users to place inventory into hold bins within a location.
This feature is very helpful when users need to isolate a product or quantity of a product and prevent it from being used in certain transactions - picking or shipping, for example. In situations where inventory needs to be quarantined, go through an inspection process, be segregated because of damages, or held for future return, this feature can add a lot of value.
Once the inventory is on hold, it cannot be used for shipment and the quantity available is changed as a result. It’s also important to note that moving a product into a hold bin at one location will not impact that product at other locations. For system-wide holds that impact all locations, please see Recalling a lot.
This page is focused on using hold bins to place inventory on hold in OpenBoxes. The examples below assume a hold bin has already been created. For additional information on creating hold bins for inventory management, please see Creating Hold Bins
Let’s look at examples on how to place inventory on hold, the impact it will have on quantity available, and the appearance of held inventory in reporting within OpenBoxes.
Transfer Stock into a Hold Bin
Let’s assume that a problem was discovered with item 10176, and one of the lots needs to be placed in a hold bin. We’ve been informed that the lot in question is RT378. Let’s first start in our electronic stock card. We are able to locate the lot on the ‘In Stock’ tab. We can see there are 500 tablets in that lot, and we currently have 4,500 on hand and available.


We can transfer stock directly into the designated hold bin from the stock card by selecting ‘Transfer Stock’ from the dropdown menu to the left.


This brings us to a modal where we will enter important information about our transfer. The origin information on the left is automatically populated. For the destination information on the right, we need to input our destination location, destination bin location, and the quantity to transfer.
Because this is an internal transfer, our destination location will be the same as the origin. For bin location, we will select ‘Hold Bin 1A’ from the dropdown, which is the designated hold bin for this site. For quantity, we will transfer the full 500 since we received word that there was an issue with the entire lot.


Click on the blue ‘Transfer Stock’ button to process this transaction. This brings us back to the stock card and you will notice a few key changes:
- The bin location on this lot has been changed to ‘Hold Bin 1A.'
- The lot in question is now highlighted in orange. This alerts users that the lot is now on hold and cannot be used. You will later see this highlighting elsewhere as it is consistent in many different areas of OpenBoxes for hold product.
- The quantity available for this lot has now been reduced to zero.
- There is now a hold tag to the right of the lot and quantity information.
- The overall quantity available for this product has been updated to reflect the change (reduced by 500 tablets), both on the status bar on the left and in the summary on the ‘In Stock’ tab.

 We can also transfer product into a hold bin by going to Inventory > Manage Inventory > Create Stock Transfer. For more details on Stock Transfer functionality, please see the article on stock transfers.

 Let’s go through another example and assume we need to place all lots of item 10351 on hold. Once we are in the stock transfer workflow, a search for this item code reveals that there are two lots in inventory. Let’s select both lots by checking the box next to the code. Then select ‘Start Stock Transfer' to proceed.

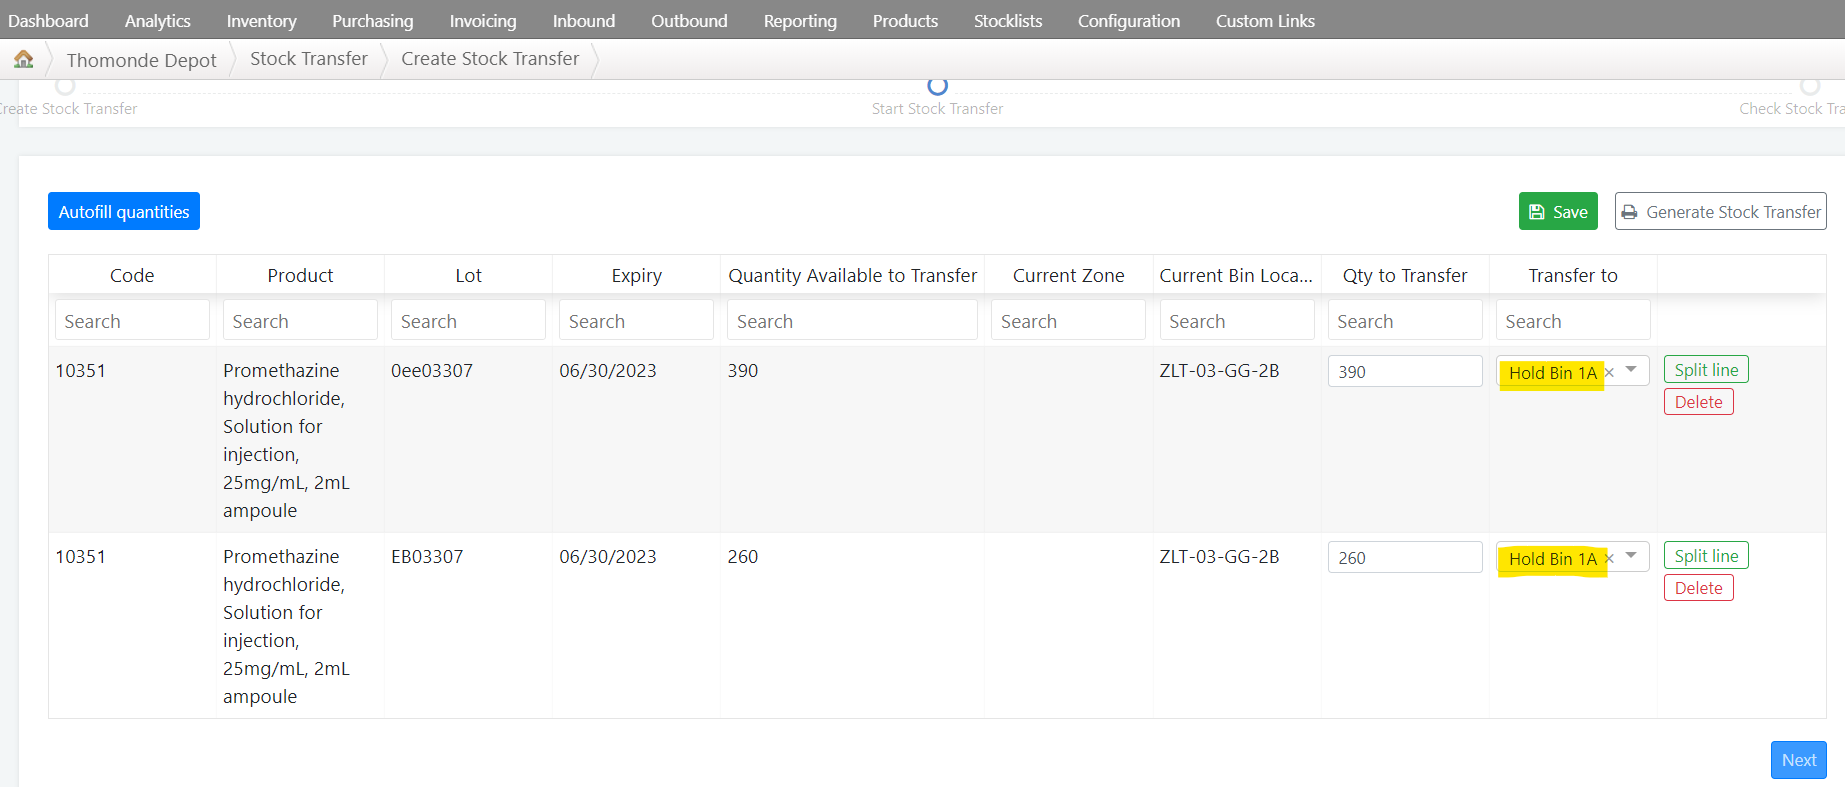
 To populate the quantity to transfer, we can select the ‘Autofill Quantities’ button since we are moving everything in stock. Next we must populate the destination location. In this case, we want to transfer into our designated hold bin for this site. Select ‘Hold Bin 1A' and hit ‘Next’ to proceed.
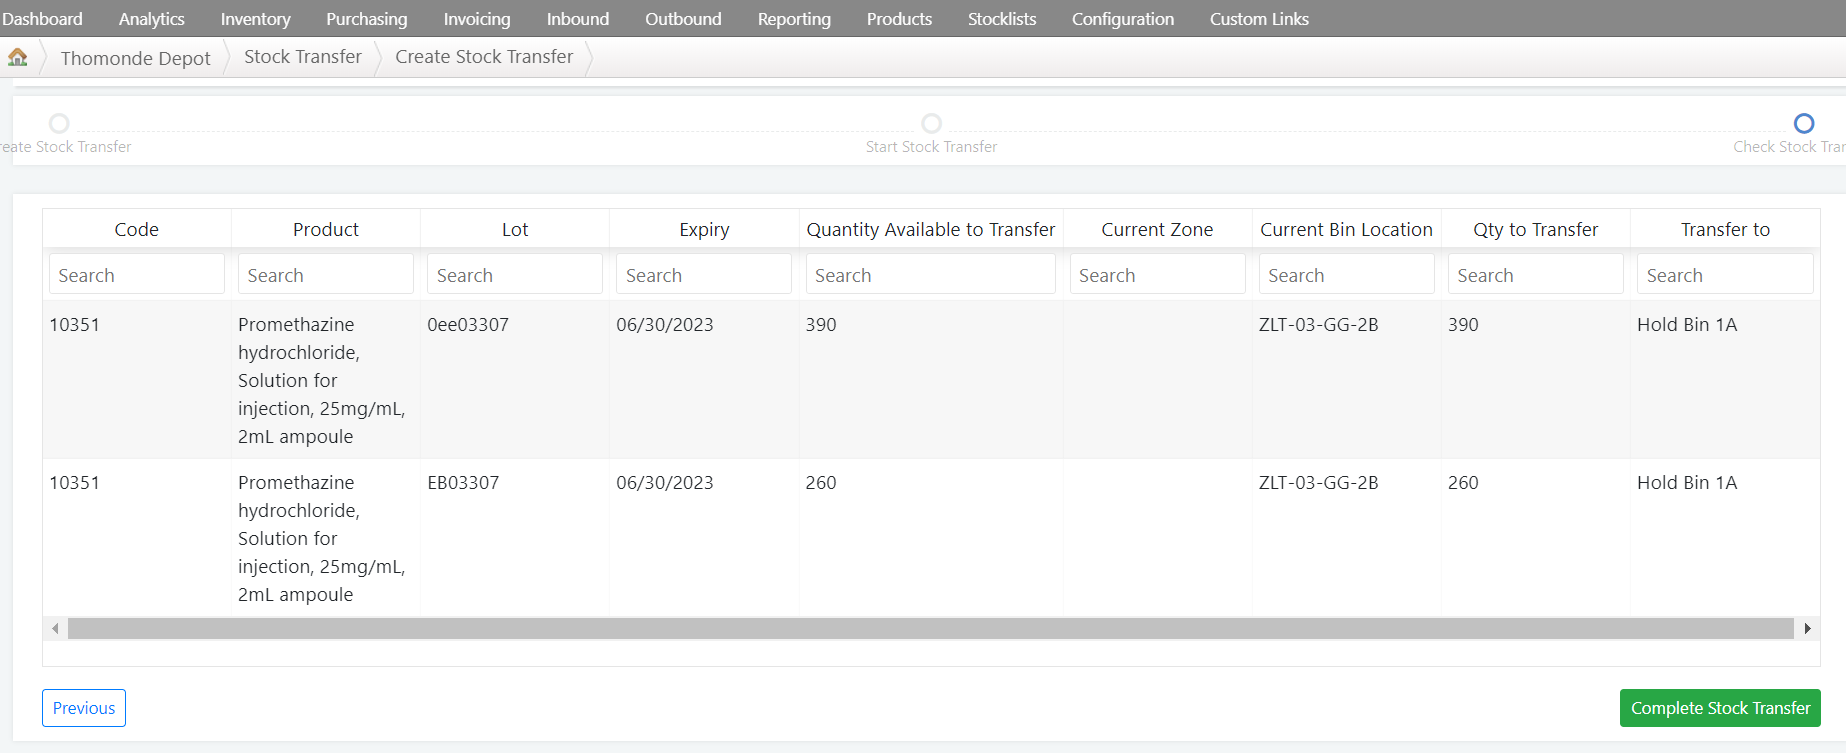
 Following that we will see the ‘Check Stock Transfer’ page where we can review all of our transfer information. Then we will hit ‘Complete Stock Transfer’ to move our product into the hold bin.
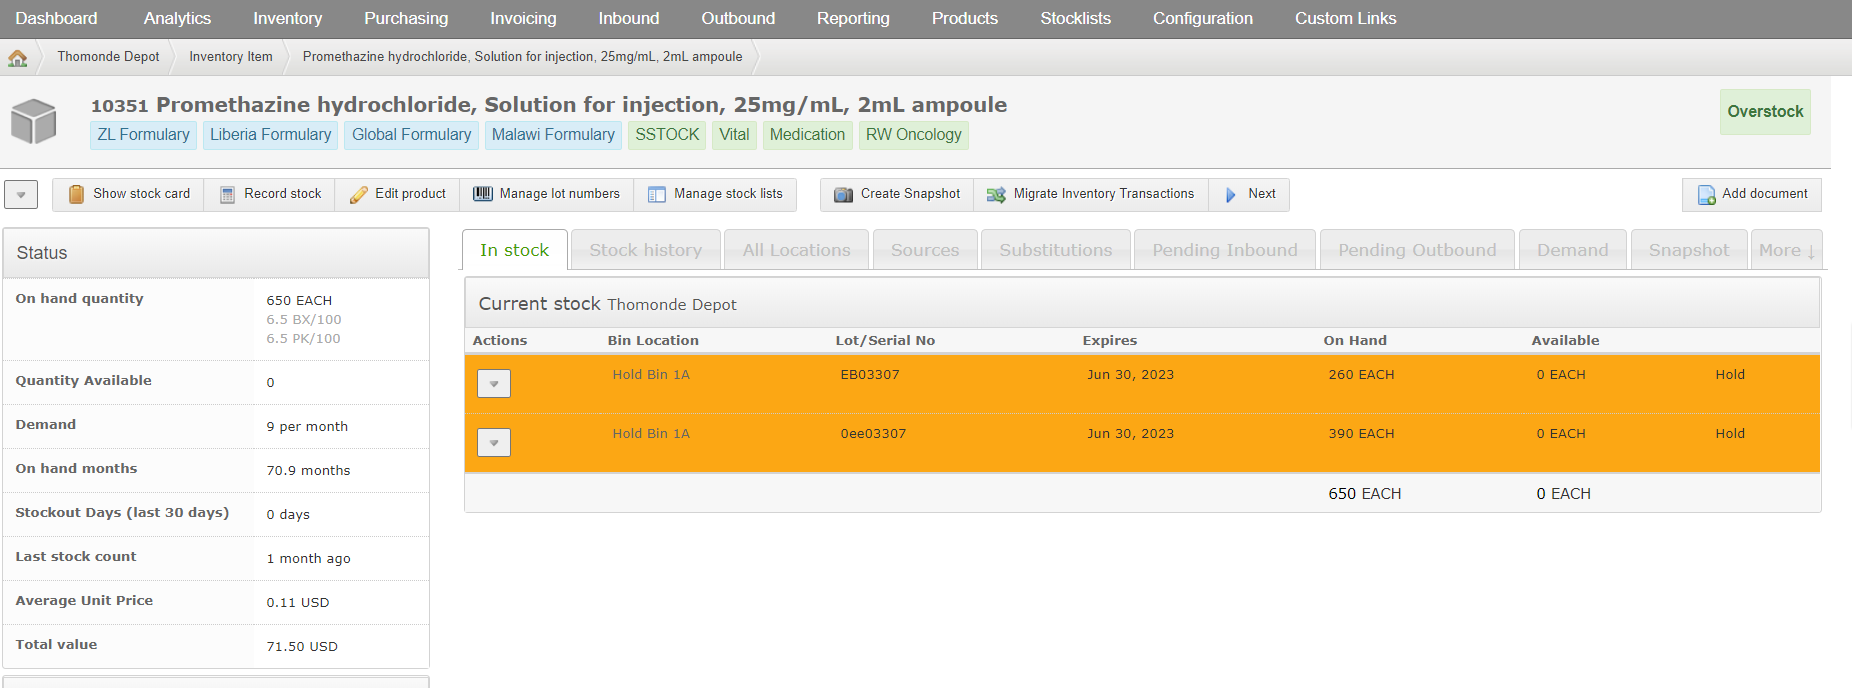
 Now that our product has been placed on hold, let’s go back to the stock card. Here we can see the same results as our first example above. The lots are highlighted, there is a hold tag, and the quantity available has been updated. These lots are now on hold and not available for shipment.

Reporting
The orange highlighting that we discussed above will carry over into other views within OpenBoxes. This helps quickly draw attention to hold items and reminds users that they are not available for use. The Bin Location Report is a good place to see this in action. Below, I’ve displayed item 10176 from our examples above. To find the bin location report, go to Reporting > Bin Location Report.


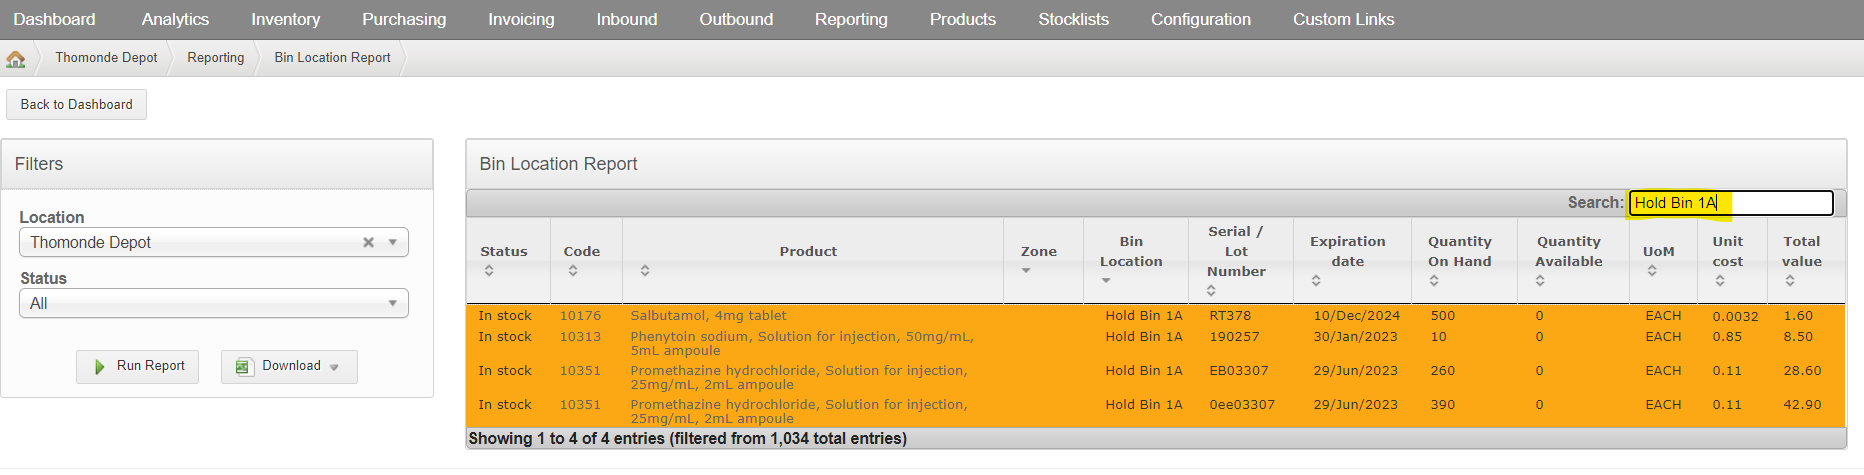
 We can also use the Bin Location Report and search specifically for our hold bin to see everything that is currently included in that location at this site. Type the name of your hold bin into the search box on the right.

Transfer Stock out of Hold Bins
In order to remove product from hold and transfer it out of a hold location, follow the same workflow for our first stock transfer above. Users will essentially follow the same path, but transfer from the hold bin to an active bin location with no restrictions.
Start in the stock card, find the lot that is on hold (it will be highlighted), select ‘Stock Transfer’ from the dropdown menu, and follow the workflow to select the appropriate bin destination.